Sebelumnya Saya juga pernah berbagi modifikasi dari widget popular post dengan style thumbnail warna-warni.
Namun kali ini Saya akan memberikan 3 style sekaligus yang bisa sobat tambahkan di blog. Ok langsung saja berikut cara penerapannya :
1. Buka Blogger > Template > Edit HTML > Tambahkan kode di bawah ini sebelum ]]></b:skin> atau </style> dan silakan pilih dari ketiga style di bawah ini :
Style 1
/* Popular Post Style 1 */
#PopularPosts1 ul{padding:10px 0;margin-top:-15px;}
.PopularPosts .item-thumbnail{margin:0}
.PopularPosts .widget-content ul{padding:0;margin-top:-7px}
.PopularPosts .item-title a{text-decoration:none;font-weight:400;font-size:14px;color:#000;line-height:1.4em;transition:all ease-in-out .1s;}
.PopularPosts .item-title{padding-bottom:.4em}
.PopularPosts .widget-content ul li:hover a,.PopularPosts .widget-content ul li a:hover{color:#48d;}
.PopularPosts li:first-child .item-snippet{position:absolute;top:0;opacity:0;visibility:hidden;width:85%;left:11px;color:#fff;background-color:rgba(172,22,172,.83);padding:10px;font-size:90%;line-height:normal;transition:.3s}
.PopularPosts li:hover:first-child .item-snippet{top:20%;opacity:1;visibility:visible}
.PopularPosts img{width:100%;height:100%}
.PopularPosts .widget-content ul li{list-style:none;margin:10px 0 0!important;padding:0 0 10px!important;line-height:1.3em!important;position:relative;border-bottom:1px solid #f1f1f1}
.PopularPosts li .item-snippet{display:none}
.PopularPosts li .item-thumbnail{width:85px;height:72px;margin:0 10px 0 0;overflow:hidden;float:left}
.PopularPosts li:first-child .item-thumbnail{width:100%;height:100%;max-height:190px;overflow:hidden;margin-bottom:10px}
.PopularPosts li:first-child .item-content{position:relative}
.PopularPosts li:first-child .item-thumbnail,.PopularPosts li:first-child .item-snippet{display:block}
.PopularPosts li:first-child .item-title a{font-size:18px;line-height:1.3em;font-weight:700}
Style 2
/* Popular Post Style 2 */
.PopularPosts .widget-content ul{padding:0;margin-top:-10px}
.PopularPosts .item-thumbnail{margin:0}
.PopularPosts .item-title {padding:0;}
.PopularPosts .item-title a{text-decoration:none;color:#000;}
.PopularPosts .item-title a:hover{color:#ff2d2d}
.PopularPosts .item-snippet{font-size:12px;line-height:1.6em;color:#777;padding-top:10px}
.PopularPosts li{border-bottom:1px dashed #e3e3e3}
.PopularPosts li .item-thumbnail,.PopularPosts li .item-snippet{display:none}
.PopularPosts li:first-child .item-thumbnail,.PopularPosts li:first-child .item-snippet{display:block;overflow:hidden;max-height:180px;margin-bottom:10px;}
.PopularPosts img{padding:0}
.PopularPosts .widget-content ul li{padding:10px 0;margin:0}
Style 3
/* Popular Post Style 3 */
#PopularPosts1 ul{padding:10px 0;margin-top:-15px;}
.PopularPosts .item-thumbnail{margin:0}
.PopularPosts .widget-content ul{padding:0;margin-top:-7px}
.PopularPosts .item-title a{text-decoration:none;font-weight:700;font-size:14px;color:#000;line-height:1.4em;transition:all ease-in-out .1s;}
.PopularPosts .item-title{padding-bottom:.4em}
.PopularPosts .widget-content ul li:hover a,.PopularPosts .widget-content ul li a:hover{color:#48d;}
.PopularPosts img{width:100%;height:100%}
.PopularPosts .widget-content ul li{list-style:none;margin:10px 0 0!important;padding:0 0 10px!important;line-height:1.3em!important;position:relative;border-bottom:1px solid #f1f1f1}
.PopularPosts li .item-snippet{position:absolute;top:0;opacity:0;visibility:hidden;width:85%;left:11px;color:#fff;background-color:rgba(172,22,172,.83);padding:10px;font-size:90%;line-height:normal;transition:.3s}
.PopularPosts li:hover .item-snippet{top:20%;opacity:1;visibility:visible}
.PopularPosts li .item-thumbnail{margin:10px 0;overflow:hidden;float:left}
.PopularPosts li:first-child .item-thumbnail{width:100%;height:100%;max-height:190px;overflow:hidden;margin-bottom:10px}
.PopularPosts li:first-child .item-content{position:relative}
.PopularPosts li:first-child .item-thumbnail,.PopularPosts li:first-child .item-snippet{display:block}
2. Selanjutnya tambahkan kode di bawah ini di atas </body>
Style 1
<script type='text/javascript'>
//<![CDATA[
function resizeThumbarlina(e,t){for(var s=document.getElementById(e),r=s.getElementsByTagName("img"),c=0;c<r.length;c++)r[c].src=r[c].src.replace(/\/s72\-c/,"/s"+t),r[c].width=t,r[c].height=t}resizeThumbarlina("PopularPosts1",400);
//]]>
</script>
Style 2
<script type='text/javascript'>
//<![CDATA[
// Popular Post
var newidth=295;var neweight=180;$(".popular-posts .item-thumbnail img").each(function(){var t=$(this).attr("width");$(this).attr("width",newidth),$(this).attr("height",neweight),$(this).attr("src",$(this).attr("src").replace("/s72-c/","/w"+newidth+"-h"+neweight+"-c/"))}),$(".PopularPosts .item-snippet").text(function(t,i){return i.substr(0,70)});
//]]>
</script>
Style 3
<script type='text/javascript'>
//<![CDATA[
function resizeThumbarlina(e,t){for(var s=document.getElementById(e),r=s.getElementsByTagName("img"),c=0;c<r.length;c++)r[c].src=r[c].src.replace(/\/s72\-c/,"/s"+t),r[c].width=t,r[c].height=t}resizeThumbarlina("PopularPosts1",400);
//]]>
</script>
3. Simpan template.
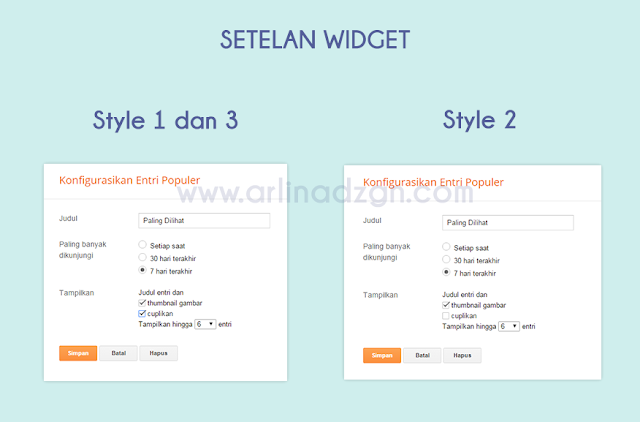
Setelan Widget
Untuk setelan widget bisa disesuaikan dengan screenshot di bawah ini :
Berikut demo tampilan menggunakan style 1 :
Sekian untuk tips blogger kali ini tentang Widget Popular Post dengan 3 Style, semoga bermanfaat.


Post a Comment